Learn how to add a water filter to your existing non-filtered, on-wall ezH2O bottle filling station or water cooler models using the Elkay EWF172 WaterSentry VII Filter Kit. This kit can be used for any on-wall ezH2O bottle filling station or water cooler model that is currently not filtered and does not have a LED Filter Status Indicator.
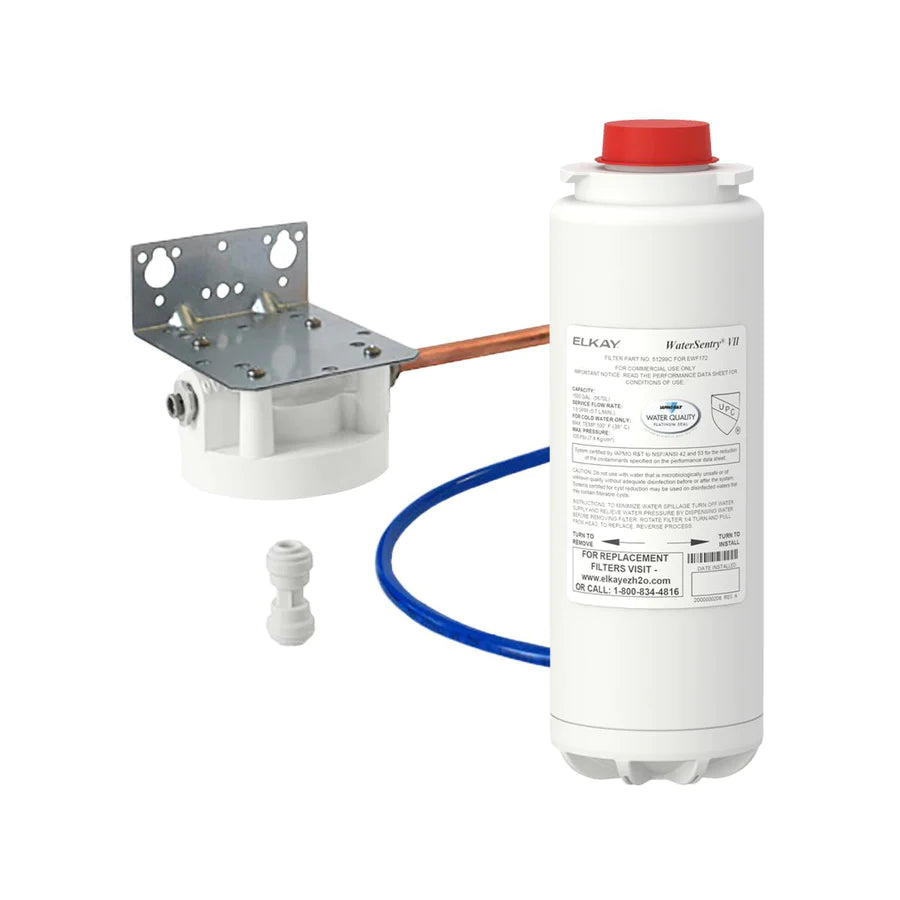
The Elkay EWF172 WaterSentry VII Filter Kit includes:
filter
filter bracket
blue poly tubing
screws
John Guest fittings
installation instructions
To avoid the danger of an electric shock hazard, disconnect power to your unit before installing or replacing the filter. These filter kits must be installed in compliance with all state and local laws and regulations governing the installation and use of this product. Maximum inlet water temperature 100°F (38°C).
Remove the four screws located at the bottom of the cooler that secure the lower front panel.
Remove the lower front panel by pulling it straight down.
Turn off the water to the unit.
Activate the push bar to relieve the pressure in the water lines.
Unplug the unit.
Disconnect the drain trap and the water line.
Remove the two screws located on the side of the unit that secures the basin assembly (see below for different configurations and filter locations examples).
Open the filter kit box and unpack its contents.
Remove the screws from the top of the filter bracket, flip the bracket over so the elongated side faces the same direction as the copper tube, and use the screws to reattach the bracket,
Mount filter bracket on the inside of the basin assembly (per the examples below). Using the screws supplied, align the holes in the bracket with those in the cooler. You may need to slightly lift the basin assembly in order to access the upper hole.
Replace the two screws removed from the frame assembly in step 7 to re-tighten the basin assembly.
Connect one end of the blue poly tubing to the filter head. For a single cooler, cut the poly tubing to length and attach the end to the cooler solenoid. For a bi-level or cooler with a bottle filling station, cut the poly tubing to length and attach the evaporator inlet. Removing any excess tubing will prevent leaks from kinks in the line.
Connect the water line to the filter's copper water inlet.
Reinstall the drain trap.
Wipe any water that has leaked out of the water or drain lines.
Plug in the unit and turn on the water.
Open the filter box and discard the protective cap. Attach the filter to the filter head by firmly inserting and rotating the filter counter-clockwise, making sure the blue label is facing forward.
Cover the bubbler and activate the push bar to remove the air in the lines. Continue to run the water on the cooler until approximately 1 gallon of water is dispensed. This flushing procedure purges air and fine carbon particles from the filter. When 1 gallon of water has been purged through the cooler, carefully inspect all water connections for leaks.
Replace the lower front panel and secure at the bottom of the unit with the four screws removed in step 1.
The WaterSentry® VII filter is tested and certified by NSF International to NSF/ANSI 42 and 53 for the reduction of Chlorine, Taste and Odor, Particulate Class I, and Lead. The filter should be replaced every 1,500 gallons or 1 year after installation. If further assistance is needed during installation, please contact our Tech Services via phone at 800-260-6640 and select option 1. Please call while you are at the existing unit in question as our Tech Services representative may have questions in order to help you properly.